Why Garbage Disposal Installation Matters for Your Home
Garbage disposal installation is one of the most practical kitchen upgrades you can make, typically taking just 1-2 hours and adding both convenience and value to your home. Whether you’re preparing to sell or simply want to improve your daily kitchen experience, installing a garbage disposal can be a smart investment.
Quick Installation Overview:
- Turn off power and water – Safety first at the circuit breaker
- Remove old drain – Disconnect existing plumbing connections
- Install mounting assembly – Secure the new flange with plumber’s putty
- Wire the disposal – Connect electrical according to manufacturer specs
- Mount and connect – Attach unit and reconnect plumbing
- Test for leaks – Run water and check all connections
Installing a garbage disposal yourself can save you around $650 in professional labor costs while giving you the satisfaction of completing a manageable DIY project. The process involves basic plumbing and electrical work that most homeowners can handle with the right tools and instructions.
Modern garbage disposals can last 10+ years with proper maintenance, making them a worthwhile upgrade whether you’re staying put or preparing your home for market. They’re particularly appealing to potential buyers who value kitchen convenience and modern amenities.
The installation process varies slightly depending on whether you’re replacing an existing unit or installing one for the first time, but the core steps remain consistent across most standard kitchen sinks.

Find more about garbage disposal installation:
Before You Begin: Tools, Parts, and Key Considerations
Let’s be honest – jumping into a garbage disposal installation without proper preparation is like trying to bake a cake without checking if you have all the ingredients first. You’ll end up frustrated, making multiple trips to the hardware store, and wondering why you didn’t just plan ahead.
The good news? With a little prep work, this project becomes surprisingly manageable. Most homeowners can complete their installation in about 1-2 hours, especially if you’re replacing an existing unit. First-time installations might take a bit longer, but that’s perfectly normal.
Safety comes first, always. Before you even think about touching any tools, head to your electrical panel and turn off the power to your kitchen circuits. Trust me, mixing electricity and water is never a good idea. Next, shut off the water supply using the valve under your sink. Don’t forget your protective gear – safety goggles and work gloves will protect you from debris and sharp edges.

Choosing the Right Disposal for Your Home
Not all garbage disposals are created equal. Choosing the right one for your home is like finding the perfect pair of shoes – it needs to fit your specific needs and lifestyle.
The biggest decision you’ll face is between continuous-feed and batch-feed disposals. Here’s what you need to know:
| Feature | Continuous-Feed Disposal | Batch-Feed Disposal |
|---|---|---|
| Operation | Accepts waste continuously while switch is on | Requires stopper to be pressed for operation |
| Convenience | More common, faster grinding | Slower, grinds one batch at a time |
| Safety | Less safe for households with small children | Safer, as the stopper acts as a safety mechanism |
| Noise | Can be noisier depending on insulation | Generally quieter during operation |
| Cost | Typically more affordable | Often higher priced |
Continuous-feed models are the popular choice for most families. You flip a switch, add food scraps while it’s running, and you’re done. Batch-feed units require you to load everything first, then twist a special stopper to activate the grinding. They’re safer if you have curious kids, but they take longer to use.
Horsepower matters more than you might think. For most households, a 1/3 to 1/2 HP unit handles daily food scraps just fine. Got a big family or love cooking elaborate meals? Consider stepping up to a 3/4 HP or 1 HP model. These powerhouses handle tougher scraps and work faster, but they’ll cost more upfront.
Sink compatibility is usually straightforward. Most standard kitchen sinks work perfectly with garbage disposals, featuring that familiar 3 1/2-inch drain opening. Just make sure you have enough space under your sink for the unit – some are bulkier than others.
Here’s something crucial that might surprise you: if you have a septic system, think twice before installing any garbage disposal. Food waste can overwhelm septic systems, leading to expensive pumping and potential failures. The bacteria in septic tanks aren’t great at breaking down food scraps, especially plant matter. Consider composting instead – your septic system (and wallet) will thank you. Understanding home systems for better real estate decisions can help you make smarter choices about home improvements.
Essential Tools and Parts for Your Garbage Disposal Installation
Nothing derails a DIY project faster than realizing you’re missing a crucial tool halfway through. Let’s gather everything you need for a smooth garbage disposal installation.
Your garbage disposal unit should come with its mounting assembly – double-check this when you unbox it. You’ll also need plumber’s putty or silicone caulk to create watertight seals. Both Phillips and flathead screwdrivers will come in handy, along with an adjustable wrench for tightening connections.
Channel lock pliers are particularly useful for securing the mounting ring, while a hammer helps knock out the dishwasher plug if needed. Keep a hacksaw or pipe cutters nearby in case you need to trim drainpipes to fit properly.
Don’t forget the practical stuff: a bucket and plenty of towels for catching residual water, wire nuts and electrical tape for safe electrical connections, and that safety gear we mentioned earlier. A flashlight or headlamp is surprisingly helpful – the area under your sink can be darker than you expect.
Some units include a disposal wrench for clearing jams, but you can always buy one separately. It’s one of those tools you hope you’ll never need but are glad to have when you do.
For more comprehensive information about home renovation tools, check out A guide to essential home renovation tools.
With everything gathered and safety precautions in place, you’re ready to tackle this rewarding DIY project. The satisfaction of completing your own garbage disposal installation is worth the effort, not to mention the money you’ll save on professional labor costs.
Your Complete DIY Garbage Disposal Installation Guide
Now comes the exciting part – actually installing your new garbage disposal! Whether you’re swapping out an old unit that’s seen better days or tackling your first garbage disposal installation from scratch, we’ll walk through each step together. Don’t worry if you’re feeling a bit nervous – with the right approach, this is totally manageable for most homeowners.
The beauty of this project is that it combines basic plumbing with simple electrical work, giving you a real sense of accomplishment when you flip that switch for the first time. We’ll be dealing with both replacing old units and handling brand-new installations, so no matter your situation, we’ve got you covered.
Step 1: Prepare the Sink and Remove the Old Drain
First things first – we need to clear the stage for your new appliance. Think of this as the prep work that makes everything else go smoothly.
Safety comes first, so double-check that you’ve turned off both the power at the circuit breaker and the water supply valves under your sink. Trust me, you don’t want any surprises while you’re working!
Clear out everything from under your sink cabinet – this gives you room to work and prevents anything from getting damaged. Grab a bucket and some old towels and position them right under the existing drain assembly. There’s always more water hiding in those pipes than you’d expect.
Now for the fun part – disconnecting the P-trap. That’s the U-shaped pipe under your sink. Use your adjustable wrench to loosen the slip nuts on both ends. Water will definitely spill out, so don’t skip that bucket! The P-trap and horizontal drainpipe should come away fairly easily once those nuts are loose.
If you’re replacing an old disposal, you’ll need to disconnect it from the mounting ring. Look for three tabs on the mounting assembly – stick a screwdriver into one of them and turn counterclockwise. Support the old unit as you do this because these things are surprisingly heavy and you don’t want it crashing down on your toes.
The final step here is removing the old sink flange from the top of your sink. You might need to do some gentle prying, and from underneath, you’ll remove all the mounting nuts and washers. Once everything’s out, give that sink opening a thorough cleaning. Any old plumber’s putty or gunk needs to come off for a proper seal later.
Step 2: Install the New Mounting Assembly
This is where your garbage disposal installation really starts taking shape. Getting a solid, leak-proof seal here is absolutely critical – it’s the foundation everything else builds on.

Start by taking your new sink flange and rolling a rope of plumber’s putty around its bottom edge. Make it about half an inch thick – this creates the watertight seal that prevents leaks. From the top of your sink, press the flange firmly into the drain opening. You’ll see some putty squeeze out around the edges, which is perfectly normal. Just wipe away the excess.
Now flip to underneath the sink for the assembly work. You’ll slide on the fiber gasket first, then the metal backup ring, and finally the upper mounting ring. The order matters here – gasket against the sink, then the backup ring, then the mounting ring.
The snap ring comes next, and this little guy can be tricky. It fits into a groove on the sink flange, and you might need to use a screwdriver to carefully work it into place. Don’t get frustrated if it takes a few tries – everyone struggles with snap rings!
Finally, tighten those mounting screws evenly. There are usually three of them, and you want to alternate between them as you tighten. This ensures even pressure and compresses that plumber’s putty into a perfect seal. Snug them down well, but don’t go crazy – you can crack the sink or damage the flange if you overtighten.
Step 3: Prepare and Wire the New Disposal
Here’s where we get into the electrical side of things. Don’t worry – it’s straightforward, but we need to be extra careful since we’re dealing with electricity and water in the same area.

Start by finding the electrical cover plate on the bottom of your disposal unit and removing it. Most modern disposals come ready for hardwiring, meaning the electrical wires from your wall connect directly to the unit. If your setup uses a plug-in outlet under the sink, you’ll need to install the appropriate power cord first.
The actual wiring is pretty straightforward once you know the color code. White wire goes to white wire (that’s your neutral), black wire connects to black wire (your hot wire), and the green or bare copper wire attaches to the green ground screw inside the disposal’s electrical compartment.
Use wire nuts to secure each connection, then wrap them with electrical tape for extra protection. This isn’t just about following code – it’s about keeping your family safe. Once all the connections are secure, carefully tuck the wires back into the compartment and replace that cover plate.
If you’re curious about how modern electrical upgrades like smart disposals can impact your home’s value, check out our guide on The impact of smart home tech on real estate.
Step 4: Connect the Dishwasher (If Applicable)
If you have a dishwasher, it needs to drain somewhere – and that somewhere is usually your garbage disposal. This step is quick but important.
Look for the dishwasher knockout plug on the side of your disposal unit. It’s a small circular area that looks like it’s meant to be punched out – because it is! Take a screwdriver handle or similar blunt object, hold it against the center of the plug, and give it a firm whack with your hammer.
Here’s the crucial part: you must retrieve that plastic plug from inside the disposal chamber. Reach in (with the power still off!) and fish it out. If you leave it in there, your dishwasher won’t drain properly, and you’ll have a mess on your hands later.
Once the disposal is mounted, you’ll connect your dishwasher drain hose to this inlet with a hose clamp. For now, just make sure that plug is gone.
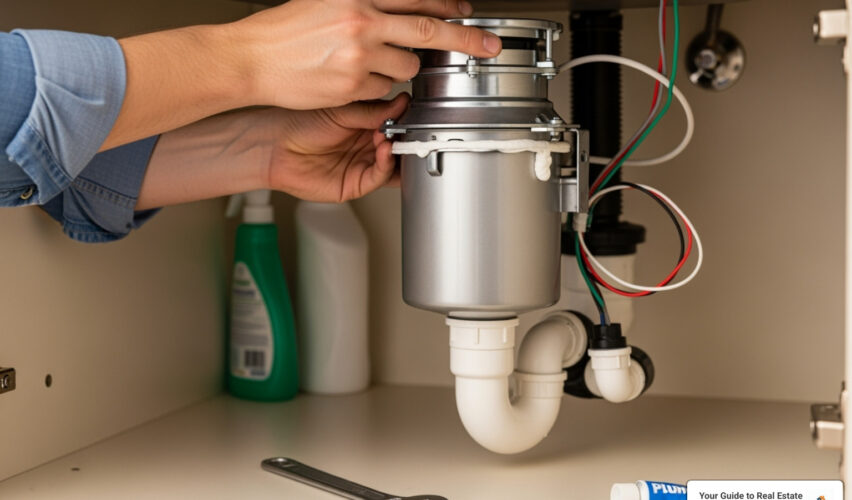
Step 5: Mount the Disposal and Connect the Plumbing
We’re in the home stretch now! This is where everything comes together and your garbage disposal installation becomes a reality.

Lifting the disposal unit is probably the most physically demanding part of this whole project. These units are heavy, so take your time and get a good grip. You’re looking to align the three mounting tabs on top of the disposal with the grooves on the mounting ring you installed earlier.
Once those tabs are lined up, twist the disposal clockwise until it locks into place. You should feel it seat firmly – there shouldn’t be any wobbling. If you have a disposal wrench (they sometimes come with the unit), you can use it to get a really secure connection. Otherwise, a screwdriver inserted into one of the mounting tabs works just fine.
Now comes the plumbing connections. Attach the discharge tube to the disposal’s outlet using the provided hardware. Make sure that rubber gasket is in place – it’s what prevents leaks. The discharge tube should point toward where your drainpipe will connect.
Reconnecting your P-trap is usually straightforward, but you might need to adjust pipe lengths or angles. If something doesn’t line up perfectly, don’t force it. Use your hacksaw to trim pipes as needed. When you’re tightening those slip nuts, hand-tight plus a quarter turn with your wrench is usually perfect.
If you have a dishwasher, now’s the time to connect that drain hose to the inlet you prepared earlier. A simple hose clamp does the job here.
The satisfaction of completing this installation yourself is incredible, and you’ve just added a valuable feature that future buyers will appreciate. At Your Guide to Real Estate, we know that smart home improvements like this can make a real difference in your property’s appeal.
Post-Installation: Testing, Maintenance, and Troubleshooting
The exciting part is behind us, but we’re not quite ready to celebrate yet! This final phase is where we make sure your garbage disposal installation will serve you well for years to come. Think of it as the victory lap that ensures your hard work pays off with reliable performance and longevity.
Step 6: Test for Leaks and Proper Operation
This is our moment of truth – where all our careful work either comes together beautifully or reveals any issues we need to address. Don’t worry though; most problems at this stage are simple fixes.
Start by slowly turning the water supply back on to your sink. Take your time here – we want to spot any problems before they become bigger issues. Grab your flashlight and carefully inspect every single connection you’ve made during the installation process.
Pay special attention to the sink flange seal where your disposal meets the sink bottom. Look for any water droplets or moisture around this area. Next, check the discharge tube connection and all your drainpipe connections including the P-trap. Run your hand along these connections to feel for any dampness that might not be immediately visible.
If you find a leak, don’t panic! Most leaks at this stage are simply connections that need a gentle tightening. For drainpipe issues, use your adjustable wrench to snug up the slip nuts – but remember, we want “snug,” not “gorilla tight.” If the leak is at the sink flange, you might need to tighten those three mounting screws just a bit more.
Once you’re confident everything is dry and secure, it’s time for the big moment. Restore power at the circuit breaker and head back to your sink. Turn on a steady stream of cold water – always cold water with garbage disposals – and flip that switch.
Listen for a smooth, strong grinding sound. Your new disposal should hum confidently to life without any rattling or unusual noises. Let it run for about 15-30 seconds with the cold water flowing steadily. This final test with the unit running gives you one last chance to spot any leaks that might only appear under operating pressure.
Troubleshooting Your New Garbage Disposal Installation
Even the most careful garbage disposal installation can sometimes present a few hiccups. The good news is that most issues are straightforward to resolve, and we’ve got you covered.
Leaks are the most common concern after installation. If you spot water where it shouldn’t be, start with the simple solutions. Re-examine your sink flange seal, discharge tube connection, and all drainpipe joints. A gentle but firm tightening usually does the trick. However, if you have a persistent leak at the sink flange, you might need to take things apart and reapply fresh plumber’s putty.
A humming noise without any grinding action typically means something is jamming your disposal. This happens more often than you’d think! First, turn off the power immediately for safety. Use your flashlight to peer into the drain opening and look for any foreign objects like bottle caps, utensils, or large food pieces. If you see something, use pliers or tongs to remove it – never use your hands, even with the power off.
If nothing visible is causing the jam, look for the disposal wrench that came with your unit (it’s usually an Allen wrench). Insert this into the center hole on the bottom of the disposal and turn it back and forth to manually free the impellers.
No power or the unit won’t turn on can be frustrating, but it’s usually an easy fix. Check your circuit breaker first – installations sometimes trip breakers. Next, locate the small red reset button on the bottom of your disposal unit and press it firmly. You’ll often hear a satisfying click when it resets properly.
If your dishwasher isn’t draining after the installation, there’s a very good chance you forgot to knock out the dishwasher knockout plug from the disposal’s inlet. Don’t feel bad – this happens to almost everyone at least once! You’ll need to remove the disposal, properly knock out that plastic plug, and remount the unit.
How to Maintain Your Garbage Disposal for Longevity
Your new disposal can easily last 10+ years with proper care, making it a fantastic investment in your kitchen’s functionality and your home’s value. The key is developing good habits from day one.
Cold water is your disposal’s best friend. Always run cold water before you start the disposal, during operation, and for about 15 seconds after you’re done. This isn’t just a suggestion – it’s crucial for proper function. Cold water helps solidify any grease or oils so they can be chopped up and flushed away instead of coating your pipes and causing clogs.
Here’s a fun maintenance trick: grind ice cubes regularly. About once a week or every other week, toss a tray of ice cubes into your disposal and let it work its magic. The ice helps sharpen the impellers and scours the inside of the grinding chamber, keeping everything clean and efficient.
For a natural deodorizer, grind citrus peels occasionally. Lemon or orange peels will leave your disposal smelling fresh and clean. It’s like giving your kitchen a little aromatherapy session!
Now, let’s talk about what should never go down your disposal. Grease, oil, and fat are the biggest enemies – they’ll solidify in your pipes and create nasty clogs. Fibrous vegetables like celery stalks, corn husks, artichokes, and onion skins can wrap around the impellers and jam everything up.
Coffee grounds might seem harmless, but they create a sludgy mess over time. Eggshells are another common mistake – despite what some people think, they don’t sharpen the blades and can actually cause problems. Obviously, large bones, fruit pits, and anything that isn’t food should stay out of your disposal entirely.
Finally, feed your disposal in small batches. Don’t try to cram a week’s worth of food scraps down at once. Let it process each batch thoroughly before adding more. Your disposal will thank you with years of reliable service.
Frequently Asked Questions about Garbage Disposals
We get it – even after walking through the entire process, you probably still have some burning questions about garbage disposal installation. That’s totally normal! We’ve helped countless homeowners through this process, and these are the questions that come up again and again.
How long does a typical garbage disposal installation take?
Here’s the honest truth: it depends on a few factors, but most homeowners can expect to spend 1 to 2 hours on their garbage disposal installation. If you’re replacing an existing unit, you’re looking at the shorter end of that range – sometimes just an hour if everything goes smoothly.
Your experience level makes a big difference too. If you’re handy with basic plumbing and electrical work, you’ll likely breeze through it. First-timers might take the full two hours, and that’s perfectly fine! Take your time and do it right.
Professional plumbers can zip through the job much faster – often under an hour – but remember, they’ve done this hundreds of times. Don’t feel pressured to match their speed on your first go-around.
What is the typical cost of professional garbage disposal installation?
While we absolutely love empowering you to tackle DIY projects (and we know you can do this!), sometimes it’s helpful to know what the professional route would cost. Professional plumbing labor for garbage disposal installation typically runs around $650, and that’s just for the installation – not including the disposal unit itself.
If your home needs electrical work, like installing a new outlet under the sink, you might also need an electrician. That consultation could add another $60 to your bill. When you add up the national average cost including the unit and labor, you’re looking at a significant investment.
This is exactly why we’re such big fans of the DIY approach! By following our guide, you’re potentially saving hundreds of dollars while gaining valuable skills and the satisfaction of completing the project yourself.
Can a garbage disposal be installed in any type of sink?
The short answer is that most kitchen sinks can accommodate a garbage disposal, but there are a few things to check first.
The most important factor is having a standard drain opening – typically 3 1/2 inches in diameter. Almost all modern kitchen sinks have this standard size, so you’re probably good to go.
Sink material matters too, though. Stainless steel and cast iron sinks are perfect for disposals. If you have an older, thinner enamel sink, just be aware that heavier, more powerful disposals might create vibrations that could be problematic over time.
Don’t forget about under-sink space! You need enough room in your cabinet to fit the disposal unit. Measure your available space before shopping, especially if you’re considering a larger, higher-horsepower model.
The beauty of understanding these home features is that they impact both your daily convenience and your home’s value. When you’re thinking about home improvements that make sense for your situation, considering features for valuation is always smart – whether you’re staying put or planning to sell down the road. You can learn more about this in our guide on Considering home features for valuation.
Conclusion: A Valuable Upgrade for Your Home
There’s something deeply satisfying about stepping back and admiring your completed garbage disposal installation. You’ve just transformed your kitchen with your own two hands, and that’s no small feat! This practical upgrade goes far beyond convenience – it’s a smart investment that improves your daily life while adding genuine value to your home.
Think about it: no more scraping every last bit of food into the trash, no more worried glances at that growing pile of organic waste, and definitely no more dealing with those stubborn drain clogs from food particles. Your new disposal handles it all with the flip of a switch and a stream of cold water.
The financial benefits are equally compelling. By tackling this project yourself, you’ve saved around $650 in professional installation costs. That’s money that stays in your pocket while you gain the confidence that comes from mastering a new skill. Plus, when it comes time to sell your home, potential buyers consistently rank kitchen conveniences like garbage disposals as desirable features.
At Your Guide to Real Estate, we’re passionate about helping homeowners make informed decisions that improve both their living experience and their property’s market appeal. This garbage disposal installation represents exactly the kind of strategic home improvement we love to see – practical, valuable, and totally achievable with the right guidance.
Whether you’re settling in for the long haul or preparing your home for sale, upgrades like this demonstrate the power of smart home improvements. They’re investments that pay dividends in daily convenience while positioning your property competitively in the market.
If you’re considering other home improvements or thinking about your property’s overall value strategy, we’re here to help. Our proven framework takes the stress out of real estate decisions, whether you’re upgrading your current space or preparing for what’s next. When you’re ready to explore your options, let us help you find the right real estate professional to guide your home upgrades and turn your real estate goals into reality.


")